Birthday Presents

Normally, when people drive by, they probably think I’m a hired workman and say nothing to me about the house.  My wife, however, is immediately seen as the homeowner and people will express their admiration for the house to her.  That’s okay.

Today, maybe because I’ve been sitting on the porch with my laptop, people are stopping by to talk; four of them before noon.  Today is my birthday so the affirmation that I’ve done well with the house is particularly appreciated.  It’s a bit different because  homes are not often done the way we did it.

Ours is neither a Modern house or an old house.  It’s a New Old House; built around a young-ish old house.  Some of it was preserved; some reused.  Some pieces came from other old houses; some pieces are new.  It was not designed by an architect though, maybe, 100 years ago or so I might have been called one.

My original design couldn’t be built.  It was “too traditional” and the local zoning and building codes wouldn’t allow it.  Not all that the Township allowed could be done because the materials and knowledge weren’t locally available and, therefore, weren’t available for a price within our budget.

When it comes to the internet, there are house and home websites for those with old houses: Old House Journal , Old House Web , Old Houses (for sale) , Historic Properties (for sale) , Garden Web Forums – Old House (sub forum) , CIRCA Old Houses , (see my “followed” WordPress blogs).

There are websites for Modern houses: Houzz – Home Forums (and many others I tend to avoid)

Then there are websites that support doing lamentable things to old homes: This Old House , HGTV , DIY Network

But, to my knowledge, there are no sites or forums for people who’ve built a new house with the materials and aesthetics of an old house (vinyl siding and PVC trim immediately disqualifies such a home; an open floor plan could, as well).

While PBS‘s This Old House, HGTV, and DIY Network are among my TV favourites, they tend to demonstrate how to destroy traditional materials and workmanship in favour of what’s currently trendy and easy to accomplish; in an endeavor to appeal to the widest possible audience within their target demographic.

This Old House project solutions are largely governed by the companies that underwrite the show (ie. Home Depot, Lumber Liquidators, Glidden Paints, and Owens Corning) rather than what’s best for preserving the character of the old home.  Plastics have become a typical building component and traditional materials and workmanship are rarely a consideration compared to the early seasons of the show.

HGTV and DIY Network are both owned by Scripps Networks Interactive, which also owns the Food Network, Cooking Channel, Travel Channel, and Great American Country (which I’ve never seen).  HGTV is geared more for women (with a design and decorating emphasis) while DIY is geared more for men (with an emphasis on using tools and muscles).  Both require a suspension of disbelief regarding anything old.  It doesn’t take long to realize saying, “I can’t believe they’re doing THAT to that wonderful old…”, is going to sound like a broken record real fast.

[For you really young people, when a vinyl record gets scratched it would repeat the same word or words over and over.  That’s what would be called “a broken record”.]

But, for me, Scripp’s “Rehab Addict” with Nicole Curtis (which aired on DIY for the first three seasons and moved to HGTV for season four in 2014) is the one (and only) show that honours the integrity of old homes and building materials.  It is also the only show that portrays the type of work I’ve done, as well as, the thought process and budget constraints we’ve considered.  I don’t think I’ve ever seen Nicole Curtis ever do anything that with which I disagreed…and that’s saying a lot.

May 2012 – J. Benson (JB) Formally Begins His Work


On May 1, 2012, we removed the original window frames, in which the vinyl Andersen replacement windows were set, in order to resize and relocate the framing to accommodate the new window dimensions and locations.  I was surprised by the bathroom walls in that concrete (instead of plaster) was used.  Plaster wasn’t used anywhere in the original structure.  Cellulose fiberboard (ie. Homosote) was used in all the “dry” rooms and concrete in the bathroom.  What also surprised me about the bathroom walls was the thickness of the concrete.  The walls are 1″ thick to the metal lathe and another 1/4″ through the lathe for a keyway or key (to lock the concrete to the lathe).

bath wall thick textbath wall thick 2 text


From the exterior:

ext exist bath text


Normally, I wouldn’t have decreased the size of a window but, in this case, the window sill could end up being below the toilet reservoir or sink backsplash, depending on how we reconfigured the bathroom (which we hadn’t decided yet).  Thinking back on it, I think we should have installed a window the same size as those used in the kitchen.  Maybe, someday, we’ll change it back to the way it was or the current width but taller.

First Scrap Metal Load

First Scrap Metal Load


JB and I made the deal he’d take a truck load of scrap metal to Gershow http://www.gershow.com/ for $50.00 + 50%.  This load brought $191.00, JB received $120.00 and we got $71.00

Arrow showing location of former inside corner of exterior walls.

Arrow showing location of former inside corner of exterior walls.


The dark red arrow (pointing down) shows the wall (yellow rectangle) of the following pictures.

P1000596


This is how the Rec Room Bath looked after the framers had finished.  This room was added during a 1996 extension to the original house.  The wall straight ahead used to be below the roof cricket that leaked (about which I’ve previously written a few times).


This is what was underneath the fiberglass shower surround:INSIDE CORNER GHOSTING LARGE VIEW


The original cove clapboard siding hadn’t been removed.  The dark stains are mold from the leaking roof cricket.

Prior to the 1996 addition, I would be outside to take this picture.


INSIDE CORNER GHOSTING

In this close-up, one can see the ghosting left from when the right side exterior wall was sided with cove profile clapboard.


By the way, all this siding was saved for use elsewhere.  It’s still in storage.


Jim’s arrival indicated we needed to start thinking about colour schemes for the exterior.  Marina is a “white-to-eggshell beachy” kind of person and I’m a “darker-is-dignified” kind of person when it comes to colours and shades of colours.  I think this was about the time we bought America’s Painted Ladies: The Ultimate Celebration of Our Victorians and Daughters of Painted Ladies: America’s Resplendent Victorians both by Elizabeth Pomada and Michael Larsen.

Now, let me be clear, the whole “Painted Lady” ‘thing’ can look whorish to me.  Painting Victorians bright, carnival colours became popular in San Francisco in the 1960’s.  And a “painted lady” is a polite term for prostitute.  It’s application to brightly coloured Victorian homes is attributed to Pomada and Larsen.

From America’s Painted Ladies:

p. 44 – 100 Elm St., Malone, NY; This is also the house that made me feel better for having smaller windows on the front façade.  The trim colours are now different.

p. 51 – 39 Tompkins St., Cortland, NY; The attic level colours are now different.

p. 166 – 222 W. McClane St., Osceola, MN; I really like the dark blue trim with maroon accent.  But the cream colour is a common vinyl siding colour I didn’t want to imitate.

p. 174 – 212 W. VanBuren St., Gallatin, MO; This home is my favorite.  I’d love to see the floorplan.  We tried to find similar porch columns to wrap the steel support columns.  If there were a house, used as the inspiration for our project, this would probably be it.

From Daughters of Painted Ladies:

p. 36 – 515 South Avenue, Rochester, NY; Another blue and cream colour scheme which has since been repainted and is now derelict looking.

p. 65 – 229 Stuart St., Kalamazoo, MI; While I love the colours, the “spooky” was to be avoided by using yellow.  It, too, has since had a colour change.

p. 70 – 870 Mull St., Elgin, IL; The dark blue and red trimmed in cream looks nice to me.

Marina and I came up with the following palette:

P1000599

Glidden Early Morning (yellow)

Behr Southern Evening (dark blue)

Behr Winter Lake (light blue)

Glidden Deep Garnet (red)

Glidden Deep Forest Pine (green)

We originally intended to paint the window sash either a maroon or a dark green or some combination of both.  The maroon turned out to require three coats before it stopped looking a pinkish-purple.

P1000783


The Worst Weekend

Thursday, March 29, 2012

12:49 PM – The Marvin Windows were delivered at 8:20 AM without a call ahead so I could give the crew advanced notice of the delivery.  The delivery was ‘to the curb’ and it’s not like the framing crew can always stop at a moments notice to climb down to help bring the windows “inside” (though, at this point, the line between ‘inside’ and ‘outside’ was ambiguous).

Friday, March 30, 2012

6:52 AM – Just spent half an hour clearing the side yard of salvaged wood to make room for sorting the scrap metal.  There’s a lot less site cleaning since there’s little to no demo work left to do.

8:52 AM – Weldco came to put in the additional basement steel columns.  Adjusting the floor from BR#1 to BR#2 was discussed.

11:25 PM – Just spent two hours setting tarps in preparation of tonight’s storm.

Saturday, March 31, 2012

6:10 AM – Woke at 3:15 AM to find the house full of leaks.  I put every bucket, wastebasket, and garbage can I could find under the worst of the leaks.  The only room untouched was the one in which I was sleeping.

12:54 PM – Fell back to sleep around 6:30 AM and woke again at 10:30 AM to the sound of water drips hitting the baseboard heater next to the bed.  I climbed up to the 2nd. floor deck and, for the next two hours, swept off the water as it continued to rain.

Sunday, April 1, 2012

Today is my 8th. anniversary on Long Island.

10:00 AM – From 1:00 PM to 4:00 PM or so yesterday I worked on draining the tarp of water and doing what I could to correct the slopes for drainage; saw horses would have been very helpful.

5:55 PM – It started sprinkling at 5:00 PM; now it’s a steady downpour.  So much water is coming through the tarps, it’s necessary to bail out the 35 gallon garbage cans below the more steady streams.

10:15 PM – The rain finally stopped.  I’ve bailed and mopped the floors nearly non-stop for four hours.  I’m exhausted.  There’s only about a dozen drips from the “ponds” on the second floor.

P1000482

When covered with tarps, these wall frames acted as “ponds” when it rained.  Saw horses, under the tarp, with plywood or 2×4 inclines, might have helped prevent the collection of so much water.


Monday, April 2, 2012

6:30 AM – I woke around 5:15 AM and emptied the buckets and cans and mopped the floors.  The plastic over my DeWalt charger shifted during the night and it got wet and shorted-out.  I’m about 20 minutes behind schedule as I wanted to be on the second floor deck at daybreak to get most of the water off before the crew showed up.

9:27 AM – The ‘mop-up’ is effectively over.  The sun is shining.  The second floor north wall went up and the north-west wall is going up now.  Had they been up on Friday, with the tarp, the water would have run off better instead of streamed in so much.  And I wouldn’t have had such an exhausting weekend.

Beams & Headers

P1000409P1000409

Ready Header of Lindenhurst, NY supplied the second floor support beams and columns.


I took pictures of the main beam which replaced the load bearing wall between the old living room and kitchen.


P1000410P1000421


P1000421 textThe clapboard siding wasn’t removed when the northside addition was added.  The fiberboard (ie. Homosote) was attached over it.


013P1000418 text


Standing about where the upstairs guest bath doorway would be.


012

Standing in the Dining Room looking southeast toward the Living Room.

The window in the hallway will be removed and the opening enlarged.

The railing is where the new Living Room wall will go.

To the left of the railing is the basement stairwell.

Hornets WaspsSome sort of hornet/wasp nest in the wall cavity.

The header for the removed sliding glass doors to the deck was just a 2×4 oriented (flat) sideways instead of on edge.  It doesn’t actually rest on the wall stud.

This wall was so chopped up we replaced it, as shown in the picture above (centered on the plans table).


DIY “To Do” List (3/23/12)

“To Do” List from 3/23/12:

– inventory scrap metal

[not so much an “inventory” but a sorting of light steel, copper pipe, copper wire, and aluminum so each could be taken to the appropriate weigh station at Gershow Recycling http://www.gershow.com/ ]

– clean & sort high-hats (remove wires)

[there were three types of high hats: ‘insulated’ (IC), ‘open’ (non-IC), and CUL (rated for damp locations); the “wires” refer to Romex (actually any non-metallic) of the circuit from which the light was cut]

P1000422

– remove outside lights from bldg.

– photo & measure windows & doors being donated; send email to ReStore for pick-up approval

[Habitat for Humanity’s ReStore donation procedure for pick-up requires pics and details (dimensions) emailed to the coordinator for approval and pick-up appt. http://www.habitat.org/restores ]

P1000425P1000500


[none of the existing windows & doors were kept as they were all vinyl and the lower end stuff (ie. molded, hollow core doors)]

007009


P1000430

– clean deck lumber of nails, sort, re-stack

[during demolition I set aside particularly nice, long pieces that would be difficult to buy new and transport in a Toyota RAV4; if I could, I would have stacked nearly all the CJs and rafters; “deck” is a characterization indicating 2x8s or larger]

– wind-up & bag scrap wire

[as I removed the old electrical wire (BX & Romex) I’d toss it into a garbage can for later stripping and sorting; altogether around 8 x 35 gal. cans worth were scrapped]

– sort removed switches, lights, receptacles, etc. & box-up

[originally, I thought these would be reused or donated but, in the end, they were tossed because ‘new’ aren’t expensive and ‘used’, I learned, could be damaged and could be a hazard]

– assemble carport & tarp for additional storage of window delivery

[we placed the window orders before knowing about the delay from the additional footings and the subsequent rescheduling of the demolition; we didn’t think we’d have a ‘safe’ room before delivery so were going to put them in a temp carport]

– drop PC ceiling & clean-up debris

[“drop”= standing on the ceiling joists (CJs) and using a push-broom to knock the ceiling drywall down (it’s a thrill to do); “PC” = the bedroom we used as a home office where the computer was kept (later to be the kitchen)]

– remove carpeting from bedroom & drop ceiling

– remove rec. room drywall

– remove bathroom vanity

P1000695

– remove drywall in basement along all plumbing & electrical runs

[the following pics taken from same direction]

P1000244Copyright (C), Multiple Listing Service of Long Island, Inc, 2004


– remove exterior siding from PC room wall that’s being removed

– tarp & plastic in prep. of weekend rain

[rain was expected and there were a lot of materials in the yard to cover; I also wanted to tarp things “inside” just in case the house tarp leaked…which it did]

– clear basement of wood so water can be swept to drain

[I don’t remember what wood was in the basement; maybe it was the base molding, from all the rooms, we would be replacing (it was finger-jointed pine painted white)]

Diary Excerpts (3/12 – 3/20)

March 12-15, 2012

Framers arrived on-site and begin framing the first floor walls of the future living room before moving to the demolition of the roof where the sleeping porch will go.  As usual, we’ve procrastinated in packing.  We procrastinated when moving out of the previous house and now we scramble to get everything into storage.  I don’t know what we were thinking.

Thursday, March 15

Double-Pole Electric arrived to transfer wires from the service mast to the temp service pole.  In one of those situations I neither understand or tolerate, my polite request for the framers to construct the temp electric service pole went ignored while I was busy taking care of something on the other side of the worksite.  When I returned, to check in with the electrician, I found him and two assistants waiting where I left them.  No service pole; no framers working on one.  I was livid.

I have zero tolerance for any b.s. among the subs.  There have been times I’ve seen one trade sabotage another in a childish continuation of some longstanding feud.  Some simply don’t like other tradespeople out of some trade vs. trade bias.

Even though the framers were sub’d by James Benson, he and I agreed I would oversee his subs in his absence.  This let him work on other jobs until he arrived to do his part of the work.  The framers were an independent company and both owners were working on the site.  The problem was I was getting reticence from one of the principals.  A cocky bully on occasion, he was a discipline problem throughout their portion of the project.  Fortunately, his partner was someone who’s talent and professionalism made him a good counterpoint to keep things from getting out of control.  The bully whined and complained and put together a half-assed pole, which the electrician politely rejected and patiently insisted on a proper one.  With a proper pole assembled and erected to the electrician’s specs everyone got back to work.

Several times, later that day, the bully approached me in a conciliatory effort to ‘make nice’.  While I felt like the ‘mouse that roared’ http://www.imdb.com/title/tt0053084/ I also got the impression people became toward me the way a younger me used to be around my supervisors.  I could live with that.

Friday, March 16 – Sunday, March 18

At noon on Friday it was 58F (14.4C) in the room I was sleeping and 53F (11.6C) in the room adjacent.  By 8:00 P.M. it was 62F and 55.5F respectively.

Spent the weekend packing-up and taking things to the storage unit.  A trundle bed, tv, coffee maker, microwave, refrigerator, and electric heater would be my comforts for the next several months.

Marina ‘officially’ moved in with her mother in Wantagh, NY.

Monday, March 19

11:00 AM – Began demo of kitchen roof

5:00 PM – Roof over kitchen & living room is gone

6:30 PM – Finished cleaning the kitchen and living room of ceiling drywall and ceiling rockwool insulation.

Tuesday, March 20

11:46 A.M. – The first truck of the day heads to the landfill with drywall, insulation, and living room ceiling joists (the latter I had hoped to save).

The living room floor, where the dividing wall used to be, was jacked-up 1-3/4″.

3:00 P.M. – All the roof is off.

P1000391P1000403


Kitchen Demo & Raising (Razing) The Roof

The original house started to look small alongside the sheathed foyer and the skeleton of the living room (LR) south wall (which, to me, suggests the outline of Cathedrale Notre-Dame de Paris):

P1000375P1000378


It was so nice to see the cathedral kitchen ceiling come down.  If it rained now it would leak no less but, at least, there’d be no expectation of shelter.  The framing for skylights must have pre-dated the 1996 addition which required a roof cricket which terminated immediately below the skylight framing.  It would have been an even greater challenge to prevent leaks had the skylights remained in place.  As it was, the cricket was an afterthought of the addition as it rested on a layer of roof shingles without any sort of rain shield (ie. EPDM):

the roof cricked right below skylights

the roof cricked right below skylights

P1000384

P1000382


The only real down side was all the drywall and insulation left for me to clean up.

corner of kitchen where refrigerator stood showing mold

corner of kitchen, where refrigerator stood, showing mold

kitchen looking SE.  Plywood becomes arch to LR.

kitchen looking SE. Plywood becomes arch to LR.


Where the refrigerator stood, beneath the soffit from hell, mold and soggy plaster was found.

Is that a pink, plastic bundt cake mold falling from the attic?


The kitchen looking southeast.

For the next week or so, after the roof and dividing wall was removed, I could step out of my bedroom and into the open courtyard that was once our home.

The refrigerator remained in use by everyone working the site.

Copyright (C), Multiple Listing Service of Long Island, Inc, 2004


The 10 x 20 living room felt like living in a mobile home.  It’s tough arranging furniture in such a room and, without a vestibule, there was no place to store coats and footwear.

Living Room looking south; kitchen to the left

Living Room looking south; kitchen to the left


The ghost of the load bearing wall between the kitchen and living can be seen between two removed vinyl windows.


I actually enjoyed the aesthetics of “courtyard” living.  It was surreal, especially at night, when I’d go from where I slept in BR#2 and find myself outside to get to the bathroom or get something from the refrigerator; which was still in the kitchen (under plastic in photo above).

original floorplan1

Once the roof and dividing, load bearing wall between the kitchen and living room was removed the area outlined in red became a “courtyard” open to the sky.  BR#1, the bathroom, and BR#2 had ceilings so the removal of the roof was mostly unnoticeable from within.

Living room roof being removed.

Living room roof being removed.

The removal of the living room roof was fairly quick and easy.  Fortunately, I was nearby when the original attic windows were about to be tossed into the dump truck (parked behind pine tree).  I recovered two sash of a double hung and two wood screens.  The other set wasn’t recovered.

BR#1 gable roof being removed

BR#1 gable roof being removed


Note the “magic” shutters which flank the double windows.  Apparently, they magically expand to cover the entire window when closed.

That vinyl gable vent: fake!

It was just attached to the attic gable end wall as a decoration.  The attic wasn’t vented.

South yard; 1940 house on left; 1996 addition to right.

South yard; 1940 house on left; 1996 addition to right.


The south side attic vent was fake, too.  There used to be an attic window there (see below photo) but it had been improperly covered when the vinyl siding had been installed.

South side gable as is under vinyl siding.

South side gable as is under vinyl siding.

The vinyl siding was installed over this opening without proper sheathing or venting.  Then a vinyl louvered vent screen was attached to the wall to make it appear the attic was being vented (see above photo).

West (front) attic gable wall removal.

West (front) attic gable wall removal.


The front (west) attic gable wall was last to come down.  I was able to document the original house and window trim colours from this gable.

Close-up of west attic gable window frame trim.

Close-up of west attic gable window frame trim.


The pieces of trim, as well as the original sash, have been in storage awaiting restoration.


The house is topless.

Jim Benson's 'Junk to Go' truck takes away the last of the roof.

Jim Benson’s ‘Junk to Go’ truck takes away the last of the roof.

Excavating The Basement


basement textWith the gravel and topsoil scraped and piled and the concrete steps (found under the side deck) split horizontally and pushed to the back yard (to save the trouble of landfilling) for a future fire pit we began excavation for the addition basement.

P1000215P1000217 textThese two pictures are taken from the same direction. Basement under LR in foreground.


P1000216 text

The picture to left is taken from where the future front door would be.  The Japanese Maple, out of frame to the right, was too big to move and, at $1,000.00 to replace, we were hoping to preserve it.  The excavation crew was great about understanding and working around it.


'ghost' and cut concrete blocks of removed pump room

‘ghost’ and cut concrete blocks of removed pump room

During excavation we came upon a small subterranean room, of poured and concrete blocks, which had been filled in with dirt.  Excavating it we found a pump and water heater shaped cistern which supplied the original kitchen with water.  The piping down to the water table was found intact.

cutting the well pump line

cutting the well pump line

P1000210


P1000212


The above pictures show the pump mechanism and the reservoir tank found during excavation.  The reservoir probably weighed about 200 lbs (90 kgs) because it took three of us to load it into the truck for drop off at the scrap dealers’.


Inside the existing basement….

Copyright (C), Multiple Listing Service of Long Island, Inc, 2004 Copyright (C), Multiple Listing Service of Long Island, Inc, 2004


….we stripped the walls down to the metal studs and removed the fiberglass batt insulation.  Throughout the insulation were little tunnels made by mice.  I only found three dead ones; don’t know where the others went.

The finished ceilings (drywall in the above left picture; mineral-fiber composite in the above right) had to be removed in order to jack-up the sloped floor above (below picture).  The existing steel I-beam ran under the wall between the kitchen and living room.  We jacked it up about 1-1/4″.  We raised another (wood) beam as far as the copper pipes would allow (about 3/4″).

P1000394


We excavated and poured concrete footings in the existing basement in preparation of new load bearing columns that would support the new second floor.

P1000310 textP1000317


P1000319P1000313


Of course, all these new footings ruined the finished floors.


Save The Plants, Build A Berm

P1000208
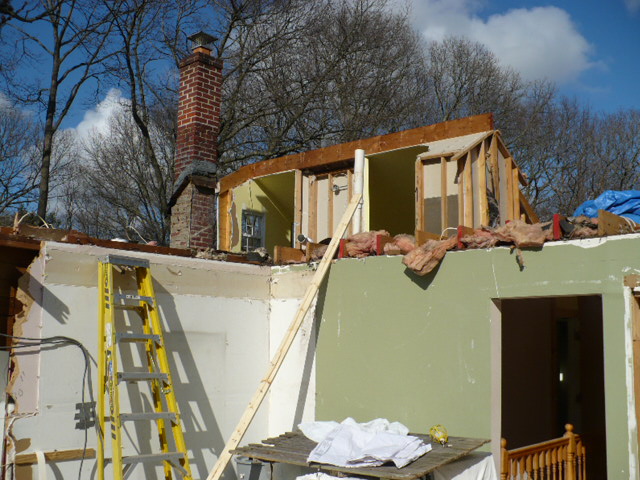
Excavation of the basement, for the addition, began December 19, 2011 [47F (8.33C)].  I asked the excavation crew to skim the layer of gravel to make a pile from which I could take for walkways. The old horseshoe shaped driveway around the back of the house was built upon  in 1996 with a rear addition [seen at left edge of photo].  The addition has just a rat slab and crawlspace which is probably why the gravel didn’t get churned up by a backhoe.  Also, I think the previous owners might have trucked in gravel for a parking lot.

P1000215They also took the first few feet of topsoil to make a second pile of topsoil for grading and to make a berm along the north driveway.  After the deck was removed we noticed the addition had been cantilevered.  I can’t imagine why anyone would cantilever a wall that’s nearly touching the ground….unless the foundation was mistakenly made too  small.  Still doesn’t make much sense.  Note the plastic on the roof.  The shingles had started coming off and we were getting some leakage.

North Driveway (Overflow Parking)

North Driveway (Overflow Parking)


This is the property line along the north driveway where the berm would be constructed.  Fences are limited to 4’0″ in the front yard.  Shrubbery can be any height.  Hence, the idea of a landscaped berm to create a wind break and a better defined property line.  The orange markers are from our land survey showing our driveway is not as wide as the drop curve (at the street) would indicate.

P1000305 textAlso, before we excavated along the front of the house for the underpinnings, we moved the shrubbery to the berm.  Nearly all survived the move.

P1000306


This picture also shows we’ve removed the composite and PVC porch, which wasn’t easy.  We found the decking screws had been put in “tight and fast” which had warped and fractured the decking material over the screw heads so they didn’t have a clear, straight path out.  It also appeared the decking material had ‘melted’ around the screw threads.  In the end, we used sawzalls and pry bars which left the material unreusable.